OAuth 2.0 Venmo and the Api Economy
Technologists are estimating that in the year 2014 we will see “the number of public and private APIs climbing to between 100,000 and 200,000” 3scale.net. Just reading this statement puts a huge smile on my face. If you haven’t figured it out yet, I find APIs extremely interesting. Web development is fun. Web development involving multiple services talking with each other is really, really fun.
Besides being an (arguably) essential skill to building modern web applications, knowing how to properly interact with APIs presents you, the developer, with an entire new world of possibilities when it comes to building applications. You might have wondered how some apps are able to post from your Facebook account or find your Twitter friends without you ever giving them your password. Well, it actually isn’t as magical as it might seem and it all happens with the help of a technology known as OAuth.
OAuth is an open protocol to allow secure authorization in a simple and standard method from web, mobile, and desktop applications. In other words, OAuth is a set of rules, that if followed correctly, allows an application to access a user’s account and do cool things with it in a secure way. If you’ve ever used an app that upon signing up requires you to authorize some other service to use your information then you have most likely already used the OAuth protocol. OAuth 2.0 is the newest version of OAuth and is what I am going to discuss in this post.
Let’s take a short walk through a recent project of mine and my great friend Matt to show you exactly how to implement OAuth. Our application needs to send money to other users and we are using an amazing service called Venmo to handle this. Venmo is an app that allows you to send your friends money. Lucky for us they have a really great API.
The OAuth flow is quite straightforward, but first we must define a few things.
OAuth is an interaction between three things:
-
Client (Third-Party Application): the application that wants to get access to the user’s account - Our application is the client in this case.
-
Resource Owner (User): the person giving access to the client - the user of our app that wants to allow us to send $$ on their behalf.
-
Resource Server (API): the API server used to access the user’s information - Venmo’s API in this case
Here’s an overview of the OAuth 2.0 flow before I break it down:

Steps:
-
Register your application with the API you would like to use. For Venmo, visit your developer’s tab and follow the steps. Once you have registered an account you will get a:
-
Client ID: this is public, so don’t worry about exposing it since it is used to build your login url.
-
Client secret: this must be kept secret so do not check it into source control!
-
-
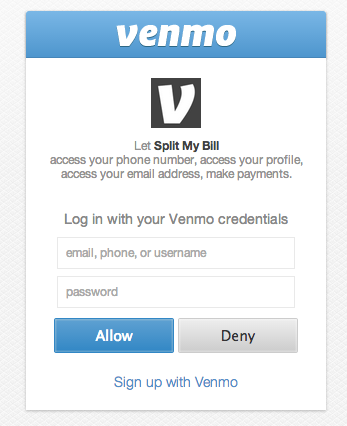
Create your login URL: The API should give you a root url that then takes s few query string parameters. In our case we append our Client ID (extracted into env variable for no good reason). We also send along a scope parameter, whose values correspond to the permissions we want. In our case we are requesting to be able to make payment’s on the user’s behalf, access user’s account profile, email, and phone number.
<%= link_to "oAuth", "https://api.venmo.com/v1/oauth/authorize?client_id=#{ENV['CLIENT_ID']}&scope=make_payments%20access_profile%20access_email%20access_phone
This link will take user to this page where they will grant our application access to their account:
-
Define a callback URL: You must define a callback url that you would like to user to be redirected to after successfully signing in and granting access to their information - the access code will be sent back with this response as a query string parameter. You will need to exchange this code for an access token, which will grant you access to the user’s information.
-
Exchange access code for access token: Now you should have three different values:
-
Client ID: (you received when you registered application)
-
Client Secret: (you received when you registered application)
-
Access Code: (you just received in the callback url)
-
Since we are using the server side flow we must now make a post request to the API from our controller with our Client ID, Client Secret, and Access Code, which will respond with a unique access token. The simplest way to do this in Ruby is with a cool gem called HTTParty. Add this gem to your gemfile:
/gemfile
gem "httparty"
Run bundle to install.
Now we will use this gem’s methods to send a post request from the controller that handles the callback URL.
your_controller.rb
def get_access_token_from_code(auth_code)
  HTTParty.post("https://api.venmo.com/v1/oauth/access_token",
                query: { client_id: ENV["CLIENT_ID"], client_secret: ENV["CLIENT_SECRET"] },
                code: auth_code)
end
HTTParty’s post method takes two parameters, the first is the url you are posting to, and the second is any data you would like to send with the request.
Since our function we defined returns the response, we call it, passing in the access code that was returned with the callback, and parse this response to get the access token.Then we check if the user already has one and if not we save it to the database, along with a couple of other values for later use:
your_controller.rb
def bill_dashboard
  if params["code"] && !@user.venmo_registered
    current_user.update_attributes(auth_code: params["code"])
    response = get_access_token_from_code(params["code"])
    current_user.update_attributes(auth_token: response["access_token"], venmo_id: response["user"]["id])
  end
end
Now that we have the access token we can have fun with their account, query for information, and even make payments on their behalf!
Questions/Comments?
Tweet me @askwheeler